Thursday, August 29, 2013

Caramelized Butternut Squash

 
Fall is right around the corner. This means that Butternut Squash will become plentiful soon. I bought a Butternut Squash at the store today. Instead of cutting it in half and roasting the squash like I normally do, I decided to try something else. I chopped the squash and then baked it in some brown sugar, butter and flax seed.
The sugar and butter caramelized during the baking process and the results were amazing! I will switch over to this way of preparing butternut squash! As for the flax seed...I try to incorporate it when I can in cooking and baking to boost up the fiber and add some omega-3's.
 
Caramelized Butternut Squash
Serves 3-4
 
Ingredients
 

1 medium butternut squash (about 2 pounds)
3 tablespoons unsalted butter, melted
3 tablespoons light brown sugar, packed
2 tablespoons flax seed or ground flax seed(optional)

Preparation

  1. Preheat the oven to 400 degrees F.
  2. Cut off the ends of the butternut squash. Peel the squash, cut them in half lengthwise, and scoop out the seeds. Cut the squash into 1 1/4 to 1 1/2-inch cubes and place them in a casserole dish. 
  3. Add the melted butter and brown sugar. Toss all the ingredients together and spread in a single layer in the casserole dish. 
  4. Bake for 45 to 55 minutes, until the squash is tender. While baking turn the squash every 15 minutes or so to incorporate the caramelized sugar onto the squash.

Kid's Pizza Lunchbox


This lunch was a big hit! It is a healthier take on Lunchables. By making the Pizza Lunch myself I was able to add some more whole grains, less sodium, less fat and less preservatives.
To make the Pizza Lunch I cut some Whole Grain Nann  into quarters (I used Stonefire brand as they contain no synthetic dyes, no artificial preservatives and they are trans fat free). I placed a small handful of reduced fat Mozzarella and Cheddar cheeses into a compartment. Finally, I put a few tablespoons of Marinara Sauce into a compartment (I used the Marinara Sauce recipe I have listed on this site).  This was served with some fresh fruit on the side.

Note:
  • I bought the container from Amazon.com. So far I am very pleased with the purchase. The container came in a pack of four and each container cost less that $3.50. They seem durable, did well in the dishwasher and are easy for kids to open. I placed a link below to the product on Amazon.com.
 

Wednesday, August 28, 2013

Mexican Skillet Dinner

This was originally a Slow Cooker recipe for a Tamale Pie. The meat mix was on the bottom and it was topped with cornbread. While I loved the idea....I found the recipe a little lacking. I thought it needed some substance. While I like slow cooker recipes, this one required to much prep and the Slow Cooking process did not add flavor. Finally, I like cornbread but not as a topping...the bottom of the cornbread was a tad pasty since it soaked up moisture from the meat and also when it came to reheat the leftovers it became a hindrance. I served the Mexican Skillet over Cilantro Lime Rice and a mini cornbread muffin on the side.
Mexican Skillet Dinner
Serves 6
Ingredients:
1 pound ground meat (93/7)
1 teaspoon cumin
1/4 teaspoon sea salt
1/2 teaspoon  chili powder
1 can (15 ounce) black beans, drained and rinsed
1 can (14 1/2 ounce) diced tomatoes and mild green chilies, undrained
1 1/2 cups frozen corn
1 can (10 ounce) mild enchilada sauce
2 green onions, chopped
1/4 cup chopped fresh cilantro
Preparation:
  1. In a large skillet cook ground beef over medium heat until fully cooked. drain
  2. Stir in the cumin, sea salt, chili powder, pepper, black beans, diced tomatoes, corn, enchilada sauce, onions and cilantro
  3. Raise heat to high and bring to a boil
  4. Reduce heat to low, cover and simmer for 20-25 minutes, stir occasionally

Notes:
  • I served it over Cilantro Lime Rice. I made the rice as directed on the package for four servings. Once the rice was completed I squeezed in juice from a fresh lime, added about  1/4 cup chopped cilantro and a dash of sea salt and pepper. I used Jasmine Rice but it also works well with brown rice.
  • To make rice I use a rice cooker. To use the rice cooker you put in the rice and the water then hit the button to cook the rice....it turns out perfectly every time. I placed a link for rice cookers at Amazon.com below.

 Shop Amazon Back to School - Save up to 50 on Select Backpacks

Tuesday, August 27, 2013

Oven Baked Potato Wedges


Here is a simple substitute for French fries. These are quick to make and they are packed with so much flavor!

Oven Baked Potato Wedges
Serves 4

Ingredients:

1/4 cup fresh grated Parmesan cheese
1 tablespoon olive oil
1 teaspoon onion powder
1 teaspoon garlic powder
1/4 teaspoon fresh ground black pepper
1/4 teaspoon sea salt
2 russet or yellow potatoes, cut into eighths and patted dry

Preparation:
  1. Preheat oven 425 degrees F.
  2. Combine Parmesan cheese, olive oil, onion powder, garlic powder, pepper, sea salt
  3. Coat the wedges with the cheese mix
  4. Bake on a sheet pan coated with cooking spray for 15 minutes then turn the wedges over and bake for 15 minutes longer, until easily pierced with a fork
Notes:
  • If you like your wedges crispier you may want to go 20 minutes on each side
  • I like using a jelly roll pan fitted with a cooling rack to bake the wedges as it makes the wedges bake more evenly. I placed a link below for Amazon.com to show what I mean.

Monday, August 26, 2013

The "Perfect" Kid's Salad


When I was preparing lunches for children I wanted to offer a salad for school lunch. I found that my idea of what makes a great salad is much different than a child's idea of a great salad. After a few attempts of making what I thought was a great kids salad I decided it was time to bring in the experts. My "experts" were kids. I asked them what veggies they liked and took lots of notes! I then visited a grocery store salad bar with some children. I had the kids create their version of the "perfect salad." The picture above is a re-creation of one child's perfect salad.

The salad includes:
  • Chic peas
  • Black Beans
  • Edamame
  • Red Kidney Beans
  • Peas
  • Corn
  • Shredded Cheddar
  • Diced Turkey Bacon
OK so it may not have an exactly perfect mix of vitamins and minerals but it is a good source of protein and has some nice color. More color equals more variety of nutrients!
One way to vary your child's lunch to include more fruits and veggies is to go to the local supermarket that has a salad bar...usually they are pay by the pound. Give  your child a container and have them build their "perfect salad".
If they enjoy the salad it could be easy to duplicate at home.
 
Note:
The container above was purchased from Amazon.com. I love the idea of Benito Boxes but typically do not like the price! Here is a lower cost alternative. These come as a four pack and end up  costing less than $3.50 per container. Here is a link to the product on Amazon.com.


Asparagus Quiche


When I think of quiche, I think of Sunday brunch. At every hotel, restaurant or retirement community I worked at we had Sunday brunch and quiche was a staple. I really like quiche but am not a fan of Sunday brunch because, all I want to do after I eat a Sunday brunch is take an afternoon nap! So this is my "go to" quiche for dinner...I usually serve it with a salad of field greens and fresh vegetables. 
So whether you are a fan of quiche for breakfast, brunch, lunch or dinner this is a nice tasty quiche.
 
Asparagus Quiche
Serves 6
 
Ingredients:
 
10 turkey bacon strips, diced
1/2 cup chopped onion
1 pound fresh asparagus trimmed and cut into 1 inch pieces
1 cup shredded reduced fat cheddar cheese
1 tablespoon all purpose flour 
1/4 teaspoon sea salt
1/8 teaspoon fresh ground pepper
1 9 inch pastry shell
5 eggs
1/2 cup fat free half and half
 
Preparation:
  1. Preheat oven 400 degrees F.
  2. In a pan cook bacon over medium heat until crisp. Remove bacon and place on paper towels to soak up excess grease. Reserve one tablespoon of drippings from pan.
  3. Sautee onion in drippings on medium heat until soft. Drain.
  4. In a sauce pan boil water. Cook cut asparagus in boiling water for 3-5 minutes. (Asparagus should be crisp-tender and tends to turn a bright green when it is cooked) Drain and cool with cold water.
  5. In a bowl toss the bacon, onion, asparagus, cheese, flour, salt and pepper. Place mixture into pastry shell.
  6. Beat eggs and half and half together and pour over asparagus mixture.
  7. Bake at 400 degrees F for 35-40 minutes or until knife inserted in center comes out clean and crust is golden brown.
  8. Let stand for 10-15 minutes before slicing.


Saturday, August 24, 2013

Have Extra Beets? Try Applesauce Beet Chocolate Cake!


OK so this sounds like a crazy concoction...but it tastes so good.

I had some extra beets once so I decided to give it a whirl. I made it one time with an old recipe I had found. It turned out to be a light fluffy super moist tasting chocolate cake and it did not taste like beets.
I felt the need to modify the recipe and lighten it up some more. The original recipe called for vegetable oil but I decided to substitute half the vegetable oil with applesauce and I switched over to canola oil and tweaked the flavorings. It turned out a tad more dense than the original but still super tasty and moist! I'll take a tad more dense cake with less fat and calories over a fluffier cake any day!
Enjoy!

Chocolate Bundt Cake

Ingredients:
1 1/2 cups pureed cooked beets (approx 1 pound)
1 teaspoon pure vanilla extract
1 1/2 cups white sugar
1/2 cup canola oil
1/2 cup unsweetened applesauce
1 3/4 cups all purpose flour
1 1/2 tsp baking soda
1/4 teaspoon sea salt
8 tablespoons unsweetened cococa powder

Preparation:
1. Preheat oven 350 degrees F and grease a Bundt pan.
2. In a large bowl using a mixer blend together beets, vanilla, sugar, oil and applesauce.
3. In a separate bowl sift together flour, baking soda, salt and cocoa powder.
4. Add dry ingredients to wet ingredients and mix well. Pour into prepared pan.
5. Bake until a toothpick inserted in comes out clean, 45-55 minutes

Notes:
  • To puree the beets: Clean the beets and put them in boiling water until the beets can be pierced with a fork. Reserve some beet water. Once the beets are cooked and cooled,  remove the skin. Place in a food processor or blender and pulse until pureed, if necessary add some beet water to puree.
  • Canned beets work as well
  • I made a simple frosting drizzle by combining soft butter, confectioners sugar, vanilla and a little milk. I then drizzled the frosting over the cake.

Thursday, August 22, 2013

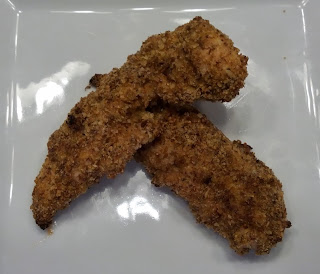
Chicken FIngers You Can Feel Good About Serving


I wanted a really good Chicken Fingers recipe that I could feel good about serving. The first step, of course, was to cut out deep frying the Chicken Fingers. The problem is once you cut out the frying though you loose some of the juiciness in the chicken and some of the crunch in the breading.  I took some recipes that I found and kind of mixed them together to create my healthier approach to chicken fingers. The Chicken Finger breading is full of fiber and also contains some ground flax seed which contain Omega-3 fatty acids which also have fiber but also may help lower cholesterol. The chicken fingers still have a crunch when baked. 


Baked Chicken Fingers
Serves 4

Ingredients
 
1/2 cup wheat germ
1/2 cup All Bran Cereal
1/4 cup Italian seasoned breadcrumbs
2 tablespoons ground flax seed
2 tablespoons grated Parmesan Cheese
1 tablespoon olive oil
2 large eggs
1 1/2 pounds chicken tenders

 
Preparation

1. Preheat oven to 450 degrees. In a food processor, combine wheat germ, all bran cereal, breadcrumbs, flax seed, Parmesan, onion and garlic powders, sea salt, and  pepper; pulse to combine. Add olive oil; pulse to combine. Transfer crumb mixture to a large bowl.

2. In a shallow bowl, lightly beat eggs. Dip chicken in eggs (allowing excess to drip off), then dredge in crumb mixture, patting to adhere. Place on a jelly roll pan with a fitted with wire rack (if possible).

3. Bake until chicken is 165 degrees for 15 seconds 12 to 14 minutes

Note:
  • To achieve a crisp evenly cooked chicken finger I suggest baking them on a jelly roll pan fitted with a wire rack. I have put a link from Amazon below to show what I am suggesting.
  • I also added a link to some Taylor thermometers one is waterproof and one is not...I use digital thermometers to make sure that meat is cooked to temperature

Wednesday, August 21, 2013

Nut-Free School Lunch? No Problem!

As owner of a healthy alternative school lunch program I delivered hundreds of lunches a week to seven school buildings in Hudson County, New Jersey....all of which were nut free.

I wanted to serve an alternative to the staple peanut butter and jelly sandwich. I sampled several alternatives to nut spreads. When sampling my primary goals were to: Find a spread that was healthy and that had a taste and texture similar to peanut butter.

I ended up settling on Sunflower Spread. With that said I soon realized not all Sunflower Spreads are equal. One issue is that the Sunflower Spread separates and can become oily in texture by lunchtime.... Creating a very messy sandwich!

My Suggestion for a great alternative to PB&J is to use Sunbutter Brand Creamy No Stir Spread. The no stir alleviates the oil issue and helps create a great sandwich. It even holds up on the sandwich overnight!

The no stir Sunbutter is a little tough to find in stores but is available online at Amazon.com. I have put a link below if you are interested in checking it out!


Back to School Lunch Box Safety


When I was a kid my mom would make my lunch, typically a sandwich. My favorites sandwiches were egg salad or tuna sandwiches. The sandwiches were typically made in the morning, put in a sandwich bag and then placed in brown bag. The lunch bag would sit in my locker from 8am until lunch time at 11:30am. OK so not the safest food handling procedures but I survived.

Times have changed! Lunch bags and boxes have become insulated. Small ice gel packs are available to keep food in lunch boxes cool. Insulated food containers to keep hot food hot and cold food cold.

When packing a lunch please consider.

Hot food needs to be hot and cold food needs to be cold.  According to the FDA, harmful bacteria multiply rapidly on perishable foods when they are left in "the danger zone" which is 40 -140 degrees F. This means foods cold foods like deli meats, tuna salad, chicken salad, egg salad, yogurt and cheese need to stay under 40 degrees F. It is recommended by the FDA that perishable foods that have been exposed to the danger zone for two hours be discarded and that if the temperature is above 90 degrees F food should be discarded after one hour.

  In order to keep foods cold:
  • Pack lunch in an insulated lunch box and then put a frozen gel pack or two in the lunch box to keep it cold. I usually store the insulated lunch box in the refrigerator so it is already cold when I pack the lunch.
  • When making sandwiches use refrigerated bread or wraps so you are not placing cold meat on room temperature bread.
  • When making items like tuna salad, chicken salad or egg salad make sure all the ingredients are cold before mixing them together. If you refrigerate the can of tuna and mix it with cold mayo the tuna salad stays out of the danger zone.
  •  When packing yogurt I usually place it in the freezer an hour or so before school so it is extra cold when I put it in the bag.

I personally do not suggest packing a hot lunch. I have time and temperature tested some insulated food containers and have not had much success in keeping food out of the danger zone. When I questioned one manufacturer about this I was told that their standard was to keep the food at 120 degrees or higher for 5 hours. Since, the food could fall within the danger zone within the first hour and could be sitting in the danger zone for two or three hours before lunch I deemed it not worth the risk or worry. (I admit I worry a lot about food borne illness...probably sat through to many food safety classes!)

I found these icepacks at online which I thought were neat...they are sweat proof so moisture does not get all over the inside of the lunch box! See link to Amazon below.


Tuesday, August 20, 2013

Eggplant Stacker


I love Eggplant Parmesan!

I do not like the idea of the breading and eating fried foods. I started using this as a healthy alternative to Eggplant Parmesan. I usually serve this with a side of whole grain spaghetti and some extra sauce.

The recipe works really well with the Marinara Sauce recipe I posted on this site. If you do not have the time to make Marinara Sauce just use your favorite Marinara Sauce.

When I make the stackers I bake them in large soufflé cups lined with greased parchment paper. If you do not have soufflé cups you could easily bake this on a greased cookie sheet and serve unstacked over some whole wheat pasta or bake them like a lasagna in a small rectangular or square pan. Of course going one of these other routes would affect bake times!

Eggplant Stackers
Serves Two

Ingredients

1/2 pound eggplant cut into 1/4 inch slices
1 tablespoon olive oil
3/4 cup marinara sauce
3/4 cup shredded low-fat mozzarella cheese
2 tablespoons fresh shredded Parmesan cheese

Preparation
  1.       Preheat oven 400 degrees.
  2.       Brush both sides of eggplant slices with oil. Place on an ungreased baking sheet.
  3.       Bake at 400 degrees F for 8 minutes.Turn and bake 7-8 minutes longer or until lightly browned and tender. Cool on a wire rack.
  4.       Reduce heat in oven to 350 degrees.
  5.       Place one eggplant slice in each of two 10-oz. ramekins lined with parchment paper coated with nonstick cooking spray. Top each with 2 tablespoons spaghetti sauce and 2 tablespoons mozzarella cheese. Repeat layers twice. Sprinkle  tops with Parmesan cheese.
  6.      Bake, uncovered, at 350 degrees F for 20-25 minutes or until bubbly and cheese is melted.


Monday, August 19, 2013

Marinara Sauce


When I started Yipson Foods I knew I would need a very versatile Marinara Sauce. I wanted to make one sauce that could be used for various recipes.
 
I ended up making this basic sauce that we used in Baked Ziti, Lasagna and Eggplant Stackers. We also used this sauce on Whole Wheat Pizza, Spaghetti, Smashed Turkey Meatball Burgers and so much more!
 
I love this sauce because it is easy to make, works great with most recipes, it freezes well and most of all it received very high compliments from the kids we served in the schools.
Enjoy!
 
Marinara Sauce
Yield 4 cups
 
Ingredients
 
2 (14.5 ounce) cans of stewed tomatoes
1 (6 ounce) can tomato paste
4 tablespoons chopped parsley
2 teaspoons minced garlic
1 teaspoon dried oregano
1/2 teaspoon sea salt
1/4 teaspoon fresh ground pepper
5 tablespoons olive oil
1 medium onion finely chopped
1/2 cup white wine or chicken stock
 
Preparation
  1. In a food processor place stewed tomatoes, tomato paste, parsley, garlic, oregano, salt and pepper. Blend until smooth.
  2. Heat oil in a large saucepan over medium heat. Sautee onion for two minutes.
  3. Add tomato mixture and wine or chicken stock.
  4. Bring to a boil, cover and lower temperature.
  5. Simmer for 30 minutes.


Sunday, August 18, 2013

A Simple (and tasty!) Fish Recipe


One of my goals for my family in 2013 is to eat more fish. I have to say it has been a little bit of a challenge.

The types of fish I like tend to cost more than ten or twenty dollars a pound. I also find that in my recipe collection I only have a dozen strong fish recipes and I am getting bored with them.

I decided to give this recipe for Grilled Grouper with Basil-Lime Pistou I found in Cooking Light Magazine a try.

The recipe was very simple to make and the entrée packed a lot of flavor. I used Cod (it was on sale!) instead of Grouper. I paired the fish with brown rice and grilled green and yellow zucchini. The fresh herbs really complimented the simplicity of the rice and grilled veggies.

Grilled Grouper with Basil-Lime Pistou
Serves 4

Ingredients:

Pistou:

1 cup fresh basil leaves
1/4 cup (1 ounce) grated fresh Parmesan cheese
1/2 teaspoon fresh grated lime rind
2 tablespoons lime juice
1 1/2 tablespoons extra virgin olive oil
1/8 teaspoon sea salt
3 garlic cloves, chopped

Fish:
4 (6 ounce) Grouper fillets, about 1/2 inch thick.....cod works as well!
1/2 teaspoon sea salt
1/4 teaspoon fresh ground pepper
Cooking Spray

Preparation:
  1. To prepare pistou, combine first 7 ingredients in a food processor; pulse until finely chopped. Let stand 10 minutes.
  2.  Prepare grill. (a grill pan, George Foreman or an outdoor grill will work)
  3. Sprinkle fish evenly with salt and pepper.
  4.  Place fish on grill rack coated with cooking spray; grill 4 minutes on each side or until fish flakes easily when tested with a fork.
  5. Serve with approximately one tablespoon pistou.

Thursday, August 15, 2013

Sometimes You Just Need Cake


When I was working for an international food service company I was tasked to create and implement "Whole Person Wellness" concepts into Retirement Communities across the United States. At first, I thought achieving Whole Person Wellness would be eating healthy and exercising soon, I learned it is so much more....sometimes it is also just about feeling good.
After a rough day, one thing that makes me feel good is something sweet like red velvet cake!
The problem for me is one small slice can easily become two or three slices and then just knowing something like a cake is in the fridge just makes me want more cake :)
So to achieve the balance of wanting something sweet without the temptation of overindulgence I turned to cake balls!
Cake Balls are the perfect size so I can indulge without the guilt. The Cake Balls also freeze well and defrost easily in the fridge.
 
 
Red Velvet Cake Balls
Yield approx. 50

1 box red velvet cake mix (prepared and baked as directed on box for 13 X 9 cake)

1 (8oz) Package Cream Cheese
1/4 cup Butter, Softened
1 cup Confectioners Sugar
1/2 teaspoon vanilla

1/2 pound Dark Chocolate Bark
1/2 pound White Chocolate Bark

Red Food Coloring

Toothpicks, Wax Paper

1. Prepare cake as directed.
2. Prepare Cream Cheese Frosting.
     In a medium bowl, cream together the cream cheese and butter until creamy. Mix in the vanilla then, gradually stir in the confectioners' sugar. Store in the refrigerator.
3.After cake is cooked and cooled completely, crumble into large bowl.
4. Mix thoroughly with cream cheese frosting.
5. Roll mixture into quarter size balls (or munchkin sized) and lay on a wax paper covered plate or cookie sheet. Place a toothpick in each ball.
6. Freeze for balls for several hours.
7. Melt chocolate in microwave or on double boiler...there are usually directions on the package on how to melt chocolate. You may want to only do a little at a time as it is easier to make the cake balls when the chocolate is hot.
8. Dip frozen balls into melted chocolate by holding on to the toothpick.
9. Place on wax paper covered platter and remove toothpick.
10. Place in refrigerator to harden the chocolate.
11. Garnish with some melted white chocolate tinted with red food coloring. I usually just place the red chocolate in a small plastic sandwich bag and cut the corner of the bag and drizzle the chocolate on the cake balls.

NOTES: I also have made these with Milk Chocolate but by far I think the Dark Chocolate and White Chocolate are the BEST! Also, if anyone would like step by step picture instructions message me and I will send you the step by step pictures.


Wednesday, August 14, 2013

A Healthier Meatloaf

A few years back I tried finding the perfect healthy meatloaf recipe.
What I found was that most healthier meatloaf recipes I tried were BLAND and DRY.
Finally, after some experimenting and combining a few favorite parts of some recipes I came up with this recipe which became my go to meatloaf recipe.
This is one of my most requested recipes...it is quick, easy, kid friendly, moist, tasty and most of all a healthy alternative to regular meatloaf.
Enjoy!

Meatloaf
Serves  6

Ingredients
3/4  cup  ketchup, divided ( I like Simply Heinz Ketchup)
1/2  cup  quick-cooking oats
1/4  cup  minced fresh onion
2  tablespoons  chopped fresh parsley
1 1/2  tablespoons  brown sugar
1/4  teaspoon sea salt
1/4  teaspoon fresh ground black pepper
2  large egg whites, lightly beaten
1 1/2  pounds 93/7 ground beef
Cooking spray


Preparation

Preheat oven to 350°.
  1. Combine 1/2 cup ketchup and next seven ingredients (oats through egg whites) in a   large bowl.
  2. Add meat; stir just until blended.
  3. Shape meat mixture into a loaf and place on a broiler pan coated with cooking spray.
  4.  Brush 1/4 cup ketchup over meat loaf.
  5. Bake at 350° for 1 hour and 10 minutes.
  6. Cook to an internal temperature of 165 degrees for 15 seconds.
Let meatloaf 10 minutes before slicing.

NOTE: To save time place the onion and parsley leaves in a food processor and pulse until onion is minced and parsley is chopped. Add the oats, brown sugar, salt, pepper and egg whites to the food processor and pulse until ingredients are mixed. Put ground beef in a bowl and hand mix the ingredients from the food processor into the ground beef. Continue on with step 3, above.

Tuesday, August 13, 2013

Sauteed Kale with Apples

I remember using Kale as a garnish when I was working as a line cook in the 90's. I later found out it was actually edible but resisted trying Kale. Finally, at a retirement community I was working at  I tried this strange veggie and I thought it was horrible. I remember Kale being super bitter and chewy.

Last week I received Kale in my veggie box from a local farm. I know Kale is very healthy so I decided to give it another try. After some research and a little work I came up with a Kale recipe.
I was nervous as I took the first bite of the finished product but was pleasantly surprised. I really like Kale!

Here is the recipe.

Sautéed Kale with Apples
Serves 4

Ingredients:

1 Tablespoon Olive Oil
1 Medium White Onion, Sliced
2 Red Delicious Apples Cored and Cut into Bite Size Pieces
2 Teaspoons Apple Cider Vinegar,
1/8 teaspoon Sea Salt
1/8 teaspoon Black Pepper
1 Bunch Kale, Approx 4 cups, Stems Removed and Cut into Bite Size Pieces

Directions:
  1. Heat oil in a large sauté pan.
  2. Add onion and cook, stirring occasionally until tender, about 4 minutes.
  3. Add apples, vinegar and salt and pepper; cover and cook until apples are just tender, 3 minutes more.
  4. Add kale to pan, stir and cook, covered, until kale is tender, about 4-5 minutes longer.